


There are many ways to create a ZIP file on Windows 10 or 11. You can use the context menu, perform it via Command Prompt, use third-party applications, etc.-it depends on your personal preference or situation.
Today's article will show you all the different ways and methods to do this.
1. Create a ZIP file using the Windows context menu
One of the easiest ways to create a ZIP file on your Windows 10 or 11 is to use the context menu. This menu has an option that allows you to add selected files to a ZIP archive (you can add and remove items from the Windows context menu).
You do not need to install any extensions or applications to use this feature. This feature works immediately and is available in many versions of Windows.
You can use this option to add a single file, multiple files, and even entire folders to a new ZIP archive.
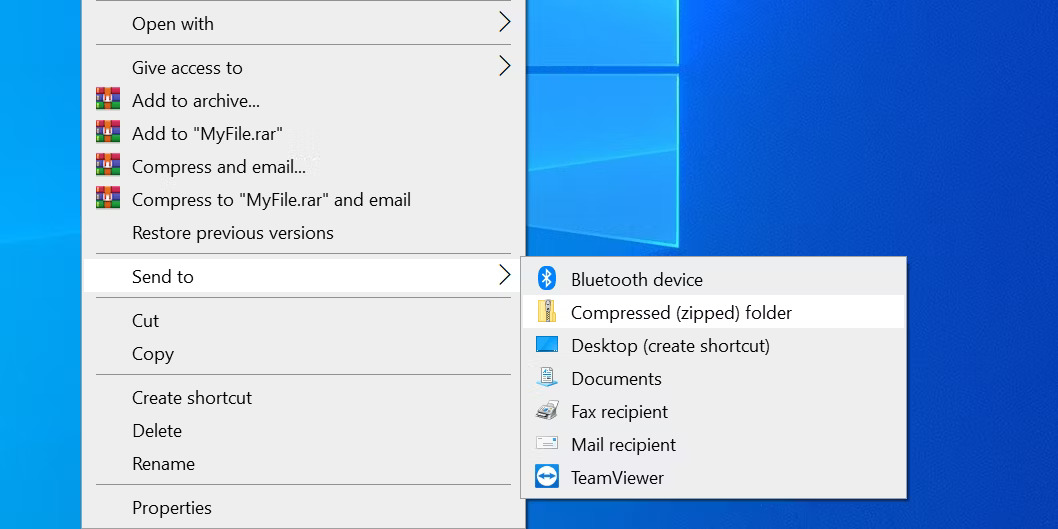
- Open the folder containing the files you want to add to the ZIP.
- Select individual files by clicking them once or CTRL + A to select all files.
- Right-click on any file and select Send to > Compressed (zipped) folder.
- Windows will create a new ZIP archive containing the files you selected.
The application will compress a new file for you immediately.
The only limitation is that this method is lacking in additional features. Therefore, if you want to use complex content such as password-protecting your ZIP files and similar things-you will have to try other methods.
2. Use File Explorer options to create ZIP files on Windows
Another integrated way to create ZIP files on Windows is to use the File Explorer ribbon options. This option works quite similarly to the context menu option, and you can use it to add both files and folders to a new ZIP archive.
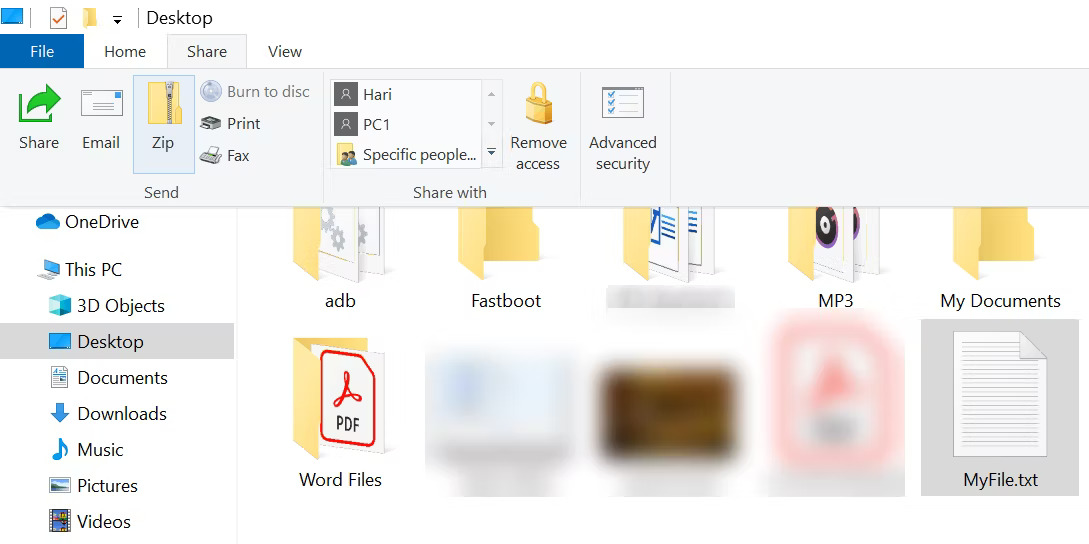
- Open the File Explorer window and navigate to the folder containing your files.
- Select the files you want to add to the ZIP archive.
- Click on the Share tab located at the top of your File Explorer window.
- You will see an option labeled Zip in the Send section. Click on this option.
- Windows will proceed to create a ZIP archive for you.
And that's it-there will be no prompts or confirmations, but your files will be compressed quickly. Unzipping these files on your Windows 10 and 11 is quite easy; just a few clicks.
On Windows 11
To compress files via File Explorer on Windows 11, the steps are slightly different.
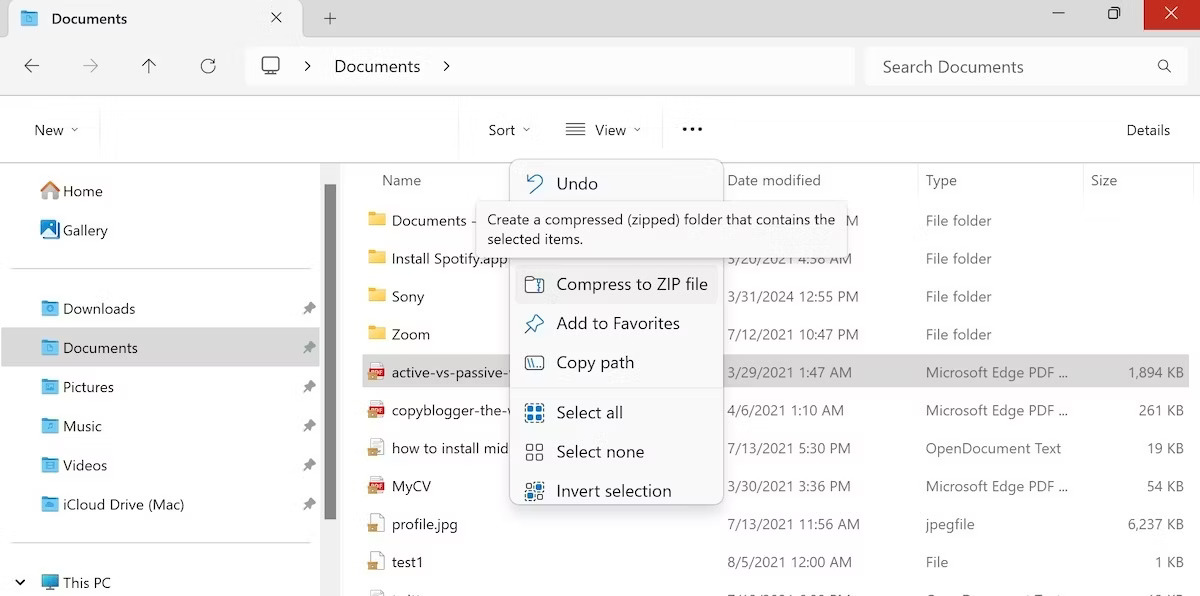
- Open File Explorer and go to the file or folder you want to compress.
- Select the file, click the three-dot ribbon at the top, then select Compress to ZIP file.
Immediately after you do this, your file will be created and compressed right next to the original file.
3. Use Windows Command Prompt to create ZIP files
Just like many other CMD tricks, there is also a command to compress your files.
Windows 10 and 11 come with a command called tar that helps create or extract archives on your PC. You can then use this command to add your existing files to a ZIP archive.
Quantrimang.com has a full guide on how to compress and extract files using Command Prompt. Just follow the steps there.
4. Use third-party applications to create ZIP files on Windows
Windows 10 and 11 allow you to create ZIP archives without any applications, but the features are quite limited. Therefore, if you want more options, such as the ability to choose compression levels and split your archive into multiple parts, you need to use a third-party archiving application.
7-Zip (free) is one of the third-party archiving tools you can use to both create and extract many types of archive documents from your computer. This tool also provides options such as splitting your archives, adding password protection, etc.
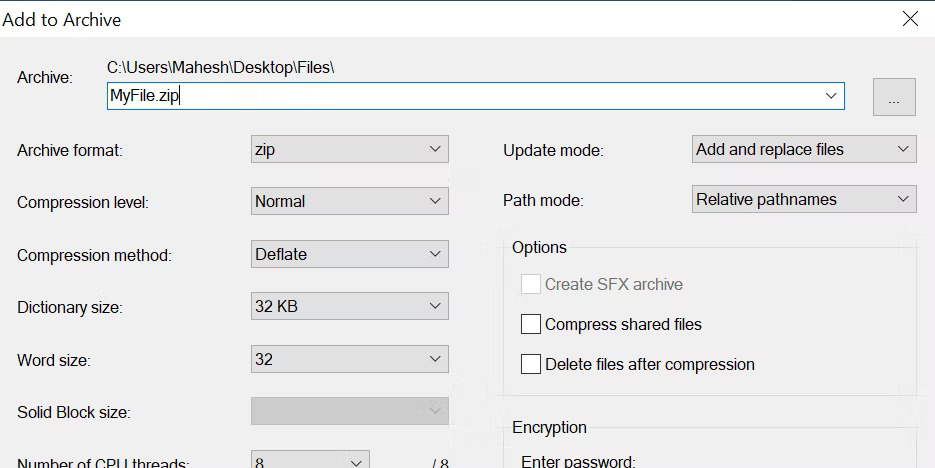
To use 7-Zip to create a ZIP file on Windows 10 or 11, follow the steps below:
- Install the 7-Zip application on your PC.
- Open the application and your files will appear. This is the application's very own file manager.
- Using this file manager, navigate to the folder containing your files.
- Select the files you want to add to your ZIP archive.
- Click Add on the top toolbar.
- Specify the output folder, archive format, compression level, and password options for your ZIP archive. Then, click OK at the bottom.
- 7-Zip will create and save the archive in the folder you selected.
And that's it-your files will be compressed exactly as you want.
As you can guess, as a Windows user, you don't have to put in much effort to create ZIP archives on your PC. Whether it is Command Prompt or File Explorer, you can compress files quite easily.











