USB boot allows us to boot a computer from a USB drive, making it extremely convenient for troubleshooting or installing Windows. In a previous article, Quản Trị Mạng guided you on how to create a Windows installation USB using the Windows 7 USB/DVD Download Tool. In the article below, we will introduce another tool for creating bootable USBs: Rufus. Despite its very small size, Rufus can meet almost all your needs. In terms of speed, Rufus is twice as fast as UNetbootin, Universal USB Installer, and Windows 7 USB download tool.
What is USB Boot?
USB Boot is a common storage device (such as a USB flash drive or an external hard drive) that has an "ISO image" of an operating system stored on it.
An ISO image is an archive file containing all the information found on an optical disc, such as a CD or DVD. For example, this could be a Windows installation CD.
Normally, whenever you start your computer, it boots from the operating system stored on the internal hard drive. However, by running a bootable USB, you can boot your computer using the ISO image on the USB.
This can be useful if you need to recover, repair, or install an operating system on your computer.
Creating a bootable USB with Rufus
To create a Windows installation USB with Rufus, you need:
- A Windows installation ISO file that you want to boot
- An empty USB drive with capacity >4GB
- The Rufus utility
After downloading Rufus, simply open it. Since this is portable software, no installation is required; it is ready to use immediately.
The steps to create a bootable USB with Rufus are as follows:
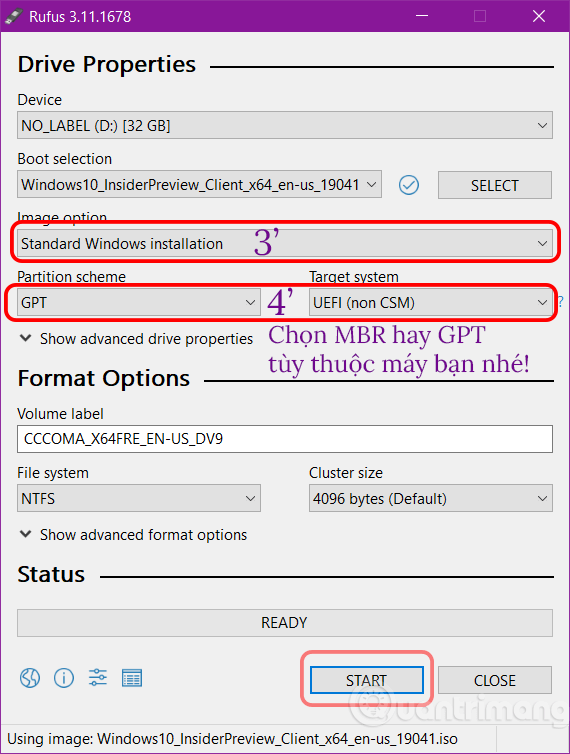
Step 1: Open Rufus and set the bootable USB parameters
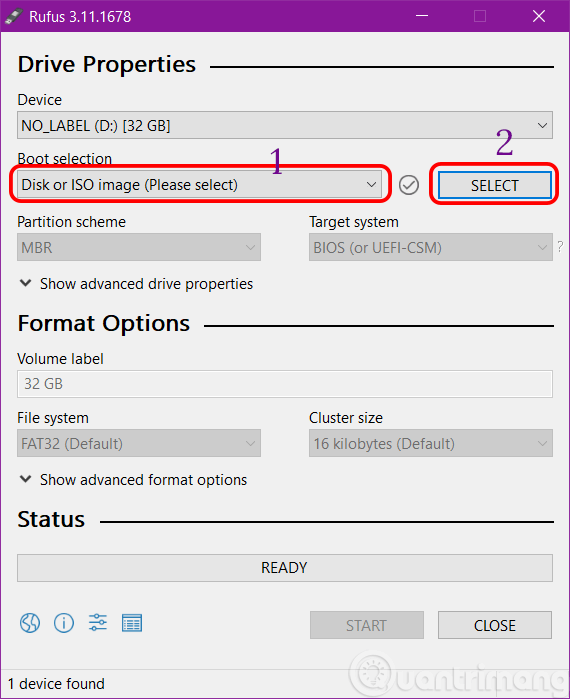
In the Rufus interface, under the Device section, select your USB drive. In Boot selection, choose Disk or ISO image, then click SELECT to browse and select your ISO file.
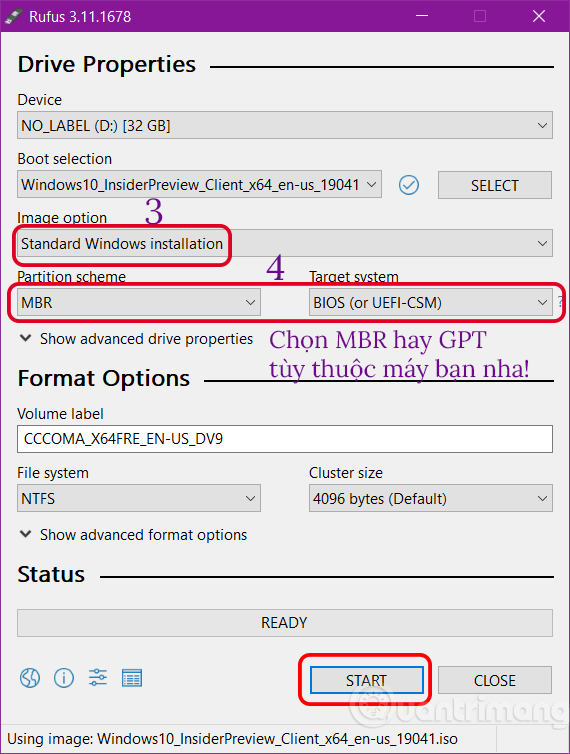
In Image option, select Standard Windows installation. Under Partition scheme, choose MBR or GPT depending on whether your machine supports BIOS or UEFI. For the File System section, leave it as NTFS, then click Start to begin.
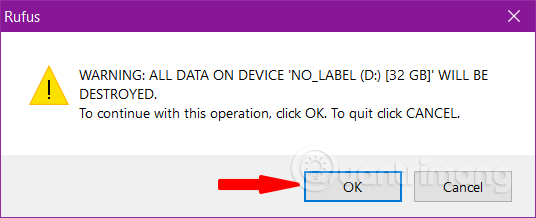
Step 2: Confirm deleting old data on the USB
A warning dialog will appear stating that the USB will be formatted. If you have important data, please copy it to your computer first. If not, click OK to continue.
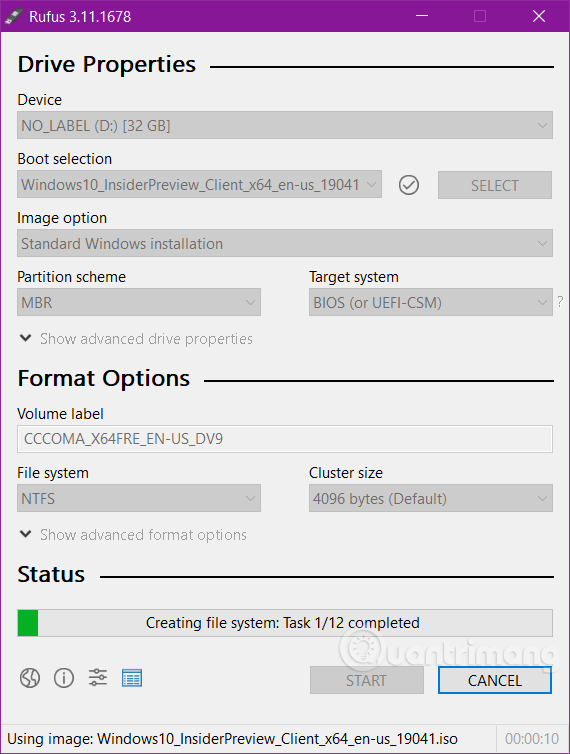
Step 3: The Windows installation USB creation process begins
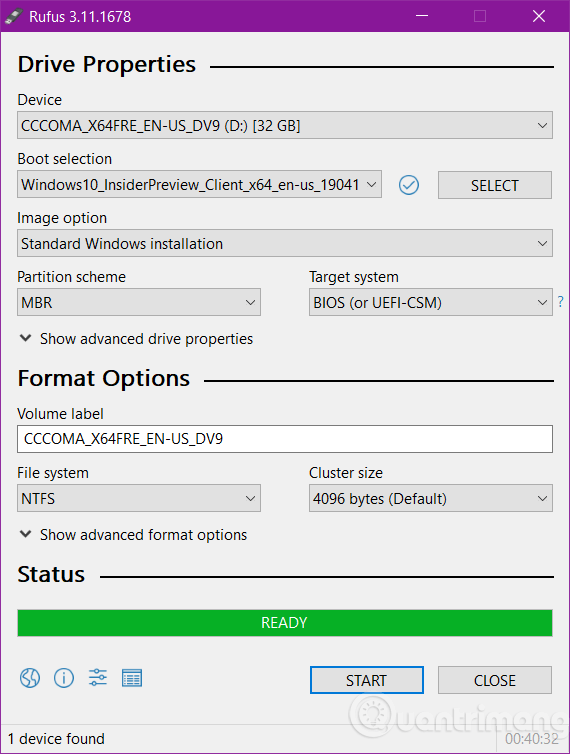
Step 4: Complete the bootable USB creation process
When the program displays the Ready button, the process is finished. Click Close to end the setup. Now, you can proceed to use your USB.
Now you know how to create a Windows installation/bootable USB using Rufus. As you can see, creating a bootable USB with Rufus is quite simple, isn't it?
To avoid errors when creating a bootable USB with Rufus, you need to select the correct ISO file that matches your computer (32-bit or 64-bit version). Otherwise, the probability of an error occurring is quite low.
Note:
While creating a bootable USB with Rufus, you may encounter some errors such as: ISO image extraction failure (ISO image extraction failure), or unable to format the USB because it is reported as Write Protected. Quantrimang.com has detailed instructional articles on how to resolve these specific errors; please refer to them.
Additionally, you must select the correct system type and file system to ensure the bootable USB can be used on your machine after creation. You can refer to how to check if a bootable USB was created successfully to see if it was created correctly and is functioning properly.
We hope this article has been helpful to you.
Source: Quản trị mạng